Step 1: Make sure both your host computer and Android device are on the same Wifi network. Step 2: Connect the Android device to the computer using your USB cable. As soon as you do that, your host computer will detect your device and adb will start running in the USB mode on the computer. You can check the attached devices withadb devices. Step 3: Restart adb in tcpip mode with this command:adb tcpip 5555Step 4: Find out the IP address of the Android device. There are several ways to do that: Go to Settings -> About phone/tablet -> Status -> IP address. Go to the list of Wi-fi networks available. The one to which you’re connected, tap on that and get to know your IP.Try $ adb shell netcfg. Enter following command to connect device over same wifiadb connect 192.168.31.219:5555Step 5: Remove the USB cable and you should be connected to your device. Try using adb devices and you will see that the device is still connected to your system. Step 6: Now open you test class and change/add the “deviceId” to the desired capabilities. capabilities.setCapability("deviceId", "IP Address:5555"); //In this case: capabilities.setCapability("deviceId", "192.168.31.219:5555"); Step 7: Now try to run your test scripts. The tests will run on the wireless connected device without any issues.
How to run automation test script on android device over WIFI
RestAssured API Automation Framework Structure
Component of Framework
1) Java
2) RestAssured
3) Maven
4) TestNG
5) Log4J
6) Jenkins
7) Eclipse


Dependencies require for RestAssured API Automation :-
1)rest-assured
2)testng
3)json-simple
4)log4j
5)extentreports
6)maven-compiler-plugin
7)maven-surefire-plugin


We can run the project in the following ways
1)testng.xml
2)POM.xml
3)mvn clean test through cmd
4)Through batch file
5)Through Jenkins

How to build BDD Framework using Java, Selenium, Maven, Cucumber, Junit
1) Following Prerequisite required into the system
a) Java should be installed.
b) Maven should be installed ( System and eclipse)
c) Environment variables should be set. JAVA_HOME and MAVEN_HOME. The path should be set.

 d) In Eclipse should be installed, Maven, Cucumber, Cucumber, Natural, Gherkin
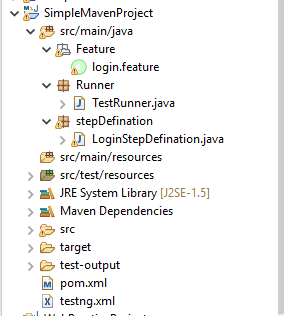
2)Create a Maven Project in the following structure
d) In Eclipse should be installed, Maven, Cucumber, Cucumber, Natural, Gherkin
2)Create a Maven Project in the following structure
 3)Add the following dependencies into POM.xml
info.cukes
cucumber-java
1.2.5
info.cukes
cucumber-junit
1.2.5
info.cukes
cucumber-jvm-deps
1.0.5
provided
net.masterthought
cucumber-reporting
5.0.2
info.cukes
gherkin
2.12.2
provided
junit
junit
4.13
org.seleniumhq.selenium
selenium-java
3.141.59
4)Create login.feature file
Feature: Test Greenlam smoke scenario
Scenario: Test login with valid credentials
Given Open Google Chrome and start application
When I enter valid "vaibhavkhachane11235@gmail.com" and valid "123456789"
Then User should be able to login successfully
5)Create TestRunner.java
package Runner;
import org.junit.runner.RunWith;
import cucumber.api.CucumberOptions;
import cucumber.api.junit.Cucumber;
@RunWith(Cucumber.class)
@CucumberOptions(features= "E:\\Automation\\SimpleMavenProject\\src\\main\\java
\\Feature\\login.feature",glue={"stepDefination"})
public class TestRunner {
}
6)Create stepDefination.java
import org.openqa.selenium.By;
import org.openqa.selenium.WebDriver;
import org.openqa.selenium.chrome.ChromeDriver;
import cucumber.api.PendingException;
import cucumber.api.java.en.Given;
import cucumber.api.java.en.Then;
import cucumber.api.java.en.When;
public class LoginStepDefination {
public String baseUrl = "https://www.greenlam.com/india/";
public WebDriver driver;
@Given("^Open Google Chrome and start application$")
public void open_Google_Chrome_and_start_application() throws Throwable {
System.setProperty("webdriver.chrome.driver", "E:\\Automation\\All Supporting Jars\\chromedriver.exe");
driver = new ChromeDriver();
driver.manage().window().maximize();
driver.get(baseUrl);
}
@When("^I enter valid \"([^\"]*)\" and valid \"([^\"]*)\"$")
public void i_enter_valid_and_valid(String arg1, String arg2) throws Throwable {
driver.findElement(By.xpath("/html/body/section/section/section[5]/section/div[1]/div[3]/a[1]")).click();
driver.findElement(By.xpath("/html/body/section/section/section[1]/div[1]/div/div/div[5]/div[3]/a/i")).click();
driver.findElement(By.id("email")).sendKeys("vaibhavkhachane11235@gmail.com");
driver.findElement(By.id("pass")).sendKeys("123456789");
}
@Then("^User should be able to login successfully$")
public void user_should_be_able_to_login_successfully() throws Throwable {
driver.findElement(By.id("send2")).click();
driver.quit();
}
}
7)Run project in the following ways
1)testng.xml
2)POM.xml
3)mvn clean test through cmd
4)Through batch file
5)Through Jenkins
While Running above Test using TestNG, We need the following snippet into TestRunner.java and
some dependencies into POM.xml
TestRunner.java
import org.testng.annotations.AfterClass;
import org.testng.annotations.BeforeClass;
import org.testng.annotations.DataProvider;
import org.testng.annotations.Test;
import cucumber.api.CucumberOptions;
import cucumber.api.testng.CucumberFeatureWrapper;
import cucumber.api.testng.TestNGCucumberRunner;
@CucumberOptions(
features = "E:\\Automation\\SimpleMavenBDDwithTestNG\\src\\main\\java\\Feature\\login.feature",
glue = {"stepDefination"},
tags = {"~@Ignore"},
format = {
"pretty",
"html:target/cucumber-reports/cucumber-pretty",
"json:target/cucumber-reports/CucumberTestReport.json",
"rerun:target/cucumber-reports/rerun.txt"
},plugin = "json:target/cucumber-reports/CucumberTestReport.json")
public class TestRunner {
private TestNGCucumberRunner testNGCucumberRunner;
@BeforeClass(alwaysRun = true)
public void setUpClass() throws Exception {
testNGCucumberRunner = new TestNGCucumberRunner(this.getClass());
}
@Test(groups = "cucumber", description = "Runs Cucumber Feature", dataProvider = "features")
public void feature(CucumberFeatureWrapper cucumberFeature) {
testNGCucumberRunner.runCucumber(cucumberFeature.getCucumberFeature());
}
@DataProvider
public Object[][] features() {
return testNGCucumberRunner.provideFeatures();
}
@AfterClass(alwaysRun = true)
public void tearDownClass() throws Exception {
testNGCucumberRunner.finish();
}
}
Dependencies are :-
1)All above Junit POM file dependencies
2)TestNg dependency
3) 4)cucumber-reporting
5) Following dependecies require to run proejct through Maven
4)cucumber-reporting
5) Following dependecies require to run proejct through Maven


API Testing using POSTMAN (Manual Testing)
We can use POSTMAN for REST API Testing We can either download POSTMAN or Google chrome Add-ons Pre Requisite Before Start To API Testing 1)POSTMAN 2)API URI 3)Payload for request HTTP Requests methods require for API Testing using Postman Create a record (POST) Retrive/Verify Data (GET) Update record (PUT) Delete record (DELETE) Domain :-https://www.google.com/ URI:- /search?source=hp&ei=NgQcXqDyNKfTz7sPpduz2Aw&q=selnium EndPoint require for API Testing Ex. http://restapi.demoqa.com/utilities/weather/city/Complete URI:- http://restapi.demoqa.com/utilities/weather/city/Paris Request Payload require for POST method { "FirstyName" : "Vaibhav", "lastName" : "Khachane", "UserName" :"tester", "Password" : tester@123 "Email" :"test@gmail.com" } We should observe following things while doing API Testing manually 1)Response Body 2)Cookies 3)Header 4)Status Code Practice API : https://reqres.in/ https://restcountries.eu/ https://openweathermap.org/current API Testing Validation Reference API:-http://restapi.demoqa.com/utilities/weather/city/Paris Step 1: Launch POSTMAN Tool Step 2: Select GET Method and Enter API ex. "http://restapi.demoqa.com/utilities/weather/city/Paris" Step 3: Click on SEND Button Step 4: Verify Response Output Manually. Now Add Verification Points Step 5: Go to the "Test" Step 6: Click on "Response headers:content-Type header check" , It will add code example. pm.test("Content-Type is present", function () { pm.response.to.have.header("Content-Type"); }); Step 7: Modify Code as per our requirement. example pm.test("Content-Type is present", function () { pm.response.to.have.header("Content-Type"); }); Above Test Case will check content-Type We can write test cases for other scenarios also TC: To verify Status code pm.test("Status code is 200", function () { pm.response.to.have.status(200); }); TC: To verify response time pm.test("Response time is less than 200ms", function () { pm.expect(pm.response.responseTime).to.be.below(1000); }); TC : To verify response Objects tests["City id is correct"]=responseBody.has("City"); tests["Temperature id is correct"]=responseBody.has("Temperature"); tests["Humidity id is correct"]=responseBody.has("Humidity"); tests["WeatherDescription id is correct"]=responseBody.has("WeatherDescription"); tests["WindSpeed id is correct"]=responseBody.has("WindSpeed"); tests["WindDirectionDegree id is correct"]=responseBody.has("WindDirectionDegree"); TC : To verify Response Values pm.test("City Name is Correct", function () { var jsonData = pm.response.json(); pm.expect(jsonData.City).to.eql("Paris"); console.log("I am getting this value from API ",jsonData.City); }); pm.test("Temperature value is correct", function () { var jsonData = pm.response.json(); pm.expect(jsonData.Temperature).to.eql("9.51 Degree celsius"); console.log("I am getting this value from API ",jsonData.Temperature); }); pm.test("Humidity value is correct", function () { var jsonData = pm.response.json(); pm.expect(jsonData.Humidity).to.eql("70 Percent"); console.log("I am getting this value from API ",jsonData.Humidity); }); pm.test("WeatherDescription value is correct", function () { var jsonData = pm.response.json(); pm.expect(jsonData.WeatherDescription).to.eql("broken clouds"); console.log("I am getting this value from API ",jsonData.WeatherDescription); }); pm.test("WindSpeed value is correct", function () { var jsonData = pm.response.json(); pm.expect(jsonData.WindSpeed).to.eql("8.7 Km per hour"); console.log("I am getting this value from API ",jsonData.WindSpeed); }); pm.test("WindDirectionDegree value is correct", function () { var jsonData = pm.response.json(); pm.expect(jsonData.WindDirectionDegree).to.eql("210 Degree"); console.log("I am getting this value from API ",jsonData.WindDirectionDegree); }); We can view API return values on POSTMAN console . Following are steps 1)Go to view-> Show Postamn console following line will help to fetch value on console console.log("I am getting this value from API ",jsonData.City); TC : To verify Schema use tiny validator for JSON data Use This Link to generate schema var schema = { "items": { "type": "boolean" } }; var data1 = [true, false]; var data2 = [true, 123]; pm.test('Schema is valid', function() { pm.expect(tv4.validate(data1, schema)).to.be.true; pm.expect(tv4.validate(data2, schema)).to.be.true; }); GUI for Test ResultPOSTMAN Tool GUI


NOTE:- REST API support JSON format . It is also support XML , Text, HTML format. SOAP only support XML format.


How to perform a Windows-based App Retesting.
Before update bug fixes into the windows based application , We should have an updated patch shared by the development team.

1)Closed application and stopped all running services respective to the application
2)Go the app installation drive ex. "C" Drive.
3)Go to the Program Files-> Application Folder-> "ABC"
4)Copy all updated patch files and replace them into the project folder. Ex. ABC
5)Then launch the application. Your bug fixes should be reflected in the application.
How to find log of Android and iOS Devices
To Verify Android Device log We can use ADB Make Sure ADB should be installed properly Refer following commands to get device log adb devices ENTER :- To check list of connected deivces to the machine adb logcat ENTER:- To check complete log of device adb logcat>C:\Users\user1\Desktop\log.txt ENTER:- To save complete device log Note: for macboon, adb logcat> ~/Desktop/abc.txt adb logcat -c ENTER:- To clear logTo Verify IOS Device log We can use XCODE Launch XCODE Go to the menu bar: Window → Devices and Simulators.Click View Device LogsRight-click on the App Crash and select Export LogEnter the log file name and the destination then click SaveSecond Way: Go to the menu bar: Window → Devices and Simulators.Alternative App for Gathering iOS Device Logs – iOS Console Third Way:- Besides the options above, you can also obtain iOS device logs using the iOS console app. Follow these steps: Install iOS Console Connect your iPhone to the computer Select Trust this computer on the iPhone pop-up request Start iOS Console and you will see the iOS device logs being gathered. Reproduce the problem Highlight all of the log data


Errors getting while installing Android Studio on Windows 8
I have tried to install android studio on my machine configuration OS: Windows 8 64 bit Processor: Pentium Dual-Core 2.70Ghz RAM: 4GB HDD: 500GB I have got the following error while running ADBThe above error has got while using Genymotion. But the same thing is working fine on same machine using Windows 10. Recommended COnfiguration for ANdroid studio is following


How to Record Mobile Device Screen
We can record mobile screen from desktop using Airdrod.
Mobile Device Screen Recorder

We can record Android mobile screen
Android Mobile Device Screen Recorder


We can record iOS mobile screen
iOS Mobile Device Screen Recorder
Subscribe to:
Comments (Atom)